Published
- 17 min read
How to Find Gold in Rivers (Read the Water First)
The biggest mistake I see beginners make — and I made it myself for an embarrassingly long time — is walking up to a river, picking a random gravel bar, and just starting to pan. That’s like fishing by casting into the middle of a lake and hoping for the best. You might get lucky. You probably won’t.
Finding gold in rivers is about reading the water first. The river is literally telling you where the gold is, every single second, with every current and eddy and ripple. You just have to learn the language.
I spent my first full season of prospecting basically deaf to it. I’d show up to Clear Creek near Idaho Springs, Colorado, pick whatever spot was closest to where I parked, and dig. Sometimes I’d find a flake or two. Most days I’d drive home with an empty vial and sore knees, convinced the creek was “panned out.” It wasn’t. I was just digging in the wrong places.
The day everything clicked was a Tuesday in late September. Low water, barely anyone around. I was watching leaves float downstream and noticed how they swirled into the same pocket behind a rock formation, over and over. Same spot. Every single leaf. And I thought — if leaves do that, and leaves are lighter than water, then gold, which is 19 times denser than water, must be piling up somewhere even more predictable.
That was the moment I stopped panning random gravel and started reading the river.

How Gold Moves in Water (The 30-Second Physics Lesson)
Gold is absurdly heavy for its size. A piece the size of a match head weighs more than a marble-sized chunk of quartz. This density difference is the entire foundation of river prospecting.
When floodwater rips through a creek carrying everything — sand, gravel, pebbles, gold flakes — the lighter stuff stays suspended and travels far. The heavy stuff drops out fast. Gold drops first. It falls out of the current the moment the water slows down even slightly.
That’s why placer gold deposits form where they do. Every place the current decelerates, every obstruction that creates a calm pocket, every widening of the channel that spreads the flow — gold accumulates there. Not randomly. Predictably.
The other thing gold does is work its way down. Through floods and seasonal high water, gold migrates downward through gravel layers until it hits something it can’t pass through — usually bedrock, but sometimes a clay layer or compacted hardpan. This is why the best gold is almost never on the surface. It’s at the bottom of the gravel column, sitting on bedrock.
Understanding these two principles — gold drops where current slows, and gold sinks to the bottom — tells you both where to dig and how deep to dig. Everything else is details.
Reading the River: Where Gold Settles in a Creek
Inside Bends
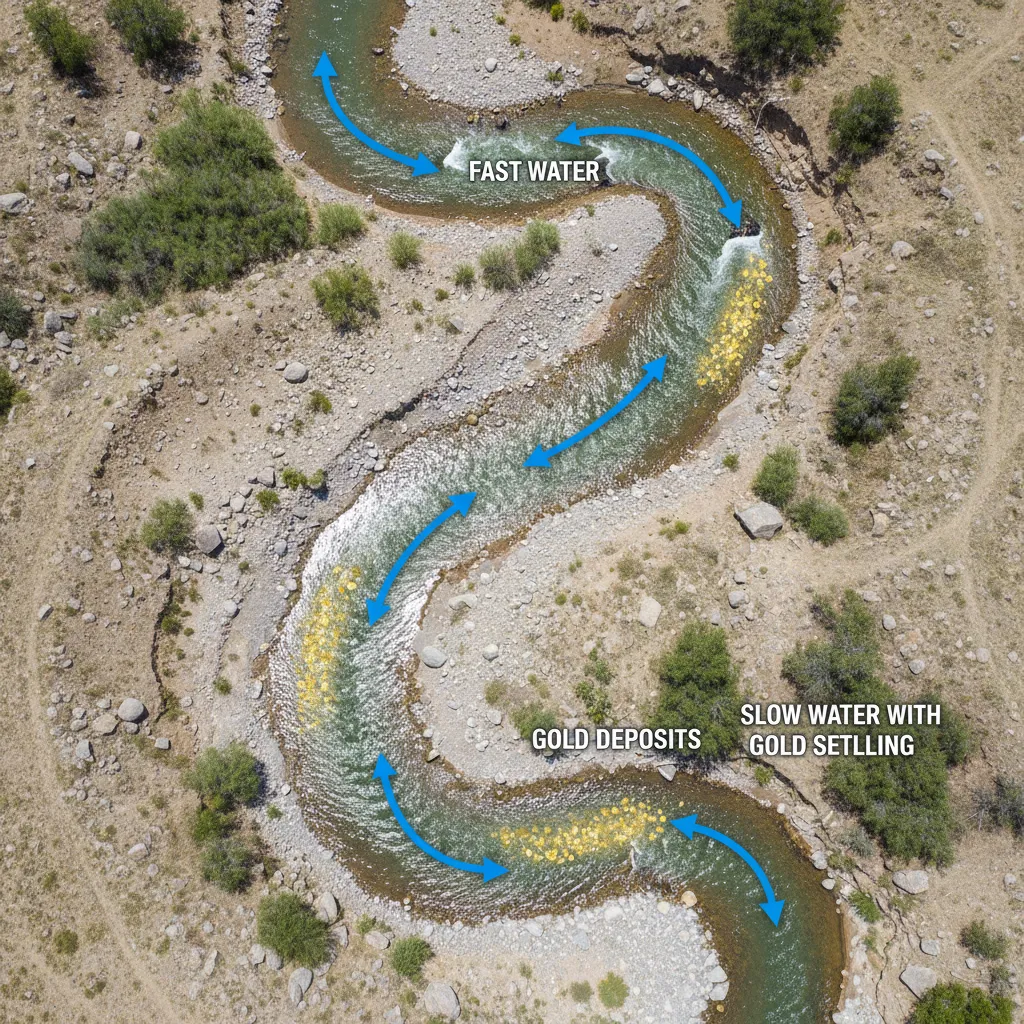
This is the single most reliable rule in prospecting. When a river curves, water speeds up on the outside of the bend and slows on the inside. You can see it happen in real time — toss a stick in the current and watch how it moves. The outside bank gets eroded. The inside bank gets a gravel deposit.
Gold in river bends follows the same physics. Fast water on the outside carries material away. Slow water on the inside drops it. The inside bend gravel bar is where gold settles, especially near the head of the bar where the current first begins to slow.
I pan the inside of every bend I encounter. It’s my first move at any new creek. I’d estimate 70% of the gold I’ve found in three years of prospecting came from inside bends. Not a precise number — I don’t keep a spreadsheet, though honestly that sounds like something I’d do — but it’s a lot.
One afternoon on a stretch of the South Platte near Fairplay, my buddy Marcus walked right past three inside bends to get to a deep pool he liked the look of. I stayed at the first bend. He got skunked. I pulled eight flakes in an hour. He still brings this up, but frames it as “I was scouting” rather than admitting I was right. Whatever, Marcus.
This inside-bend principle works everywhere gold is found — from Colorado’s mountain creeks to the rivers of North Carolina’s gold belt and the streams of northern Georgia where America’s first gold rush began in 1828. The physics is identical regardless of geography.
The Velocity Transition Zone
This is the spot most beginners walk right past, and it might be the single most productive feature in a creek after inside bends.
Wherever fast water meets slow water — not gradually, but within about a foot — gold drops out. The abrupt change in velocity is like slamming the brakes. Everything heavy falls to the bottom right at that transition line.
How to spot it: look for places where the current is visibly fast on one side and calm on the other. You’ll often see a mix of material sizes — large cobbles next to fine gravel next to leaf debris. That mixture of heavy and light material is your indicator. If you see only one uniform size of material, you’re too far downstream of the drop zone.
One experienced prospector I’ve watched describes it perfectly: “You’re looking for consistency and then the inconsistency that ends that consistency.” A stretch of uniform gravel that suddenly shifts to mixed sizes? That’s where gold is sitting.
The other clue is cobble size. Big stones generally mean big gold nearby. Little stones mean little gold. If you’re standing on a gravel bar with fist-sized cobbles mixed with black, shiny rocks (those are mafic rocks — high in iron and magnesium), you’re in a promising spot. Gold concentrates near heavy dark minerals for the same reason it concentrates behind boulders: density sorting.
Downstream of Boulders
Any large rock in the current creates a dead zone behind it. The water splits around the boulder, and right behind it there’s a pocket of relatively calm water. Gold drops there.
The bigger the boulder, the bigger the dead zone, and the more gold it can trap. I look for boulders that are at least waist-high and have been sitting there long enough to be embedded in the streambed — not the ones that just rolled in last spring.
One thing the YouTube prospecting community has taught me: gold doesn’t always sit directly behind a boulder. It actually settles in the low-pressure zone a few feet further downstream, not in the immediate eddy right behind the rock. The spot right behind a large boulder is often scoured clean. Move a couple feet downstream and you’ll find the goods.
Bedrock Cracks and Crevices
Once gold reaches bedrock, it’s essentially trapped. It can still move laterally during big floods, but it tends to find cracks and stay there. Crevices running perpendicular to the current are the best — they act like natural riffle systems, catching gold the same way the riffles in your gold pan do.
I carry a flat-head screwdriver and a set of cheap dental picks specifically for crevicing. The screwdriver handles wider cracks. The dental picks get into the tight stuff. You’d be amazed what accumulates in a crack that looks empty from above. Last fall I cleaned out a two-inch crevice on Clear Creek that was maybe eighteen inches long and got more gold from that one crack than from the previous four hours of panning gravel bars.
The trick with crevicing is thoroughness. Scrape the walls. Dig out the compacted sediment at the bottom. Use a spoon or your snuffer bottle to get the fine material out. The deepest stuff in the crack has been there the longest and has the best concentration.
One important caveat: smooth bedrock won’t trap gold. If the bedrock surface is polished and flat with no cracks or perpendicular ridges, gold slides right over it during floods. You need textured, fractured bedrock with plenty of nooks. Some prospectors even bring a metal detector to scan crevices before spending time digging them out — a faint signal from a crack is worth investigating.
Clay Banks and Flood Plains
This one surprised me the first time I learned about it, and it’s a spot almost nobody checks.
During major flood events, water doesn’t just push gold along the streambed. Some gold gets suspended in the water column itself — carried by the sheer force of the current. When that sediment-loaded flood water hits a sticky clay bank or spills onto a flood plain, gold particles adhere to the clay surface.
The practical application: scrape mud directly off exposed clay surfaces on riverbanks after flood season. Pan that material. You won’t find nuggets this way, but fine gold sticks to clay surprisingly well. I’ve tested this on a stretch of river where the clay bank had clearly been underwater during spring runoff. The first pan had more color than the gravel bar ten feet away.
This technique works best in areas where you can see a distinct clay layer exposed along the riverbank — especially where gravel is scattered across the clay surface from receding floodwaters.
Pay Streaks
A pay streak is a line of concentrated gold that follows a specific path through a river system. It’s not everywhere — it’s a narrow band, sometimes only a few feet wide, where the hydraulics have been depositing gold consistently.
Finding a pay streak is what separates people who find a few flakes from people who fill vials. The way to find one is systematic sampling — and the key is sampling across the stream, not along it. Pan five or six spots perpendicular to the water flow across a gravel bar. If one spot has ten times the gold of the others, you’ve intersected a pay streak. You can be within one foot of a serious concentration and miss it entirely if you’re only sampling downstream.
Once you find a pay streak, follow it. Sample upstream and downstream, always cross-cutting to keep track of where the band runs. The gold deposits at the front edge of black sand concentrations, not the back. If you’re finding lots of black sand but no gold, move upstream along the pay streak — you’ve overshot the deposit zone.
I’ve only found two genuine pay streaks in my prospecting career. One was on a tributary of the Arkansas River near Leadville — a band maybe three feet wide running along the edge of a bedrock shelf. Every pan from that strip had gold. Two feet to either side, nothing. That creek taught me more about where gold concentrates than any book or video.
High Bench Deposits vs. Active Stream Deposits
Here’s something that blew my mind when I first learned about it: rivers move. Over thousands of years, a river can shift its channel by hundreds of feet. The old channel dries up, but the gold stays put, sitting in ancient gravels perched above the current water level.
These are called bench deposits, and the old-timers in the 1800s figured them out fast. Some of the richest gold strikes in the richest gold-producing regions of the United States came from ancient river channels that were completely dry. The state-by-state mining data shows clusters of historical mines in areas where rivers once flowed — and many of those bench deposits have never been thoroughly worked with modern techniques.
Bench gravels can represent river positions from 100,000+ years ago. The gold in them tends to be larger and less worn than active stream gold because it hasn’t been tumbling around in moving water for millennia. If you see rounded river cobbles on a terrace twenty feet above the current creek, that’s an old channel worth sampling.
For the weekend prospector, the practical takeaway is: don’t just look at the water. Look at the terrain above the current waterline. Active stream deposits are easier to access and replenish themselves every flood season. Bench deposits are harder to work but can be richer because nobody’s been there since the 1800s.
Seasonal Timing: When to Find Gold in Rivers
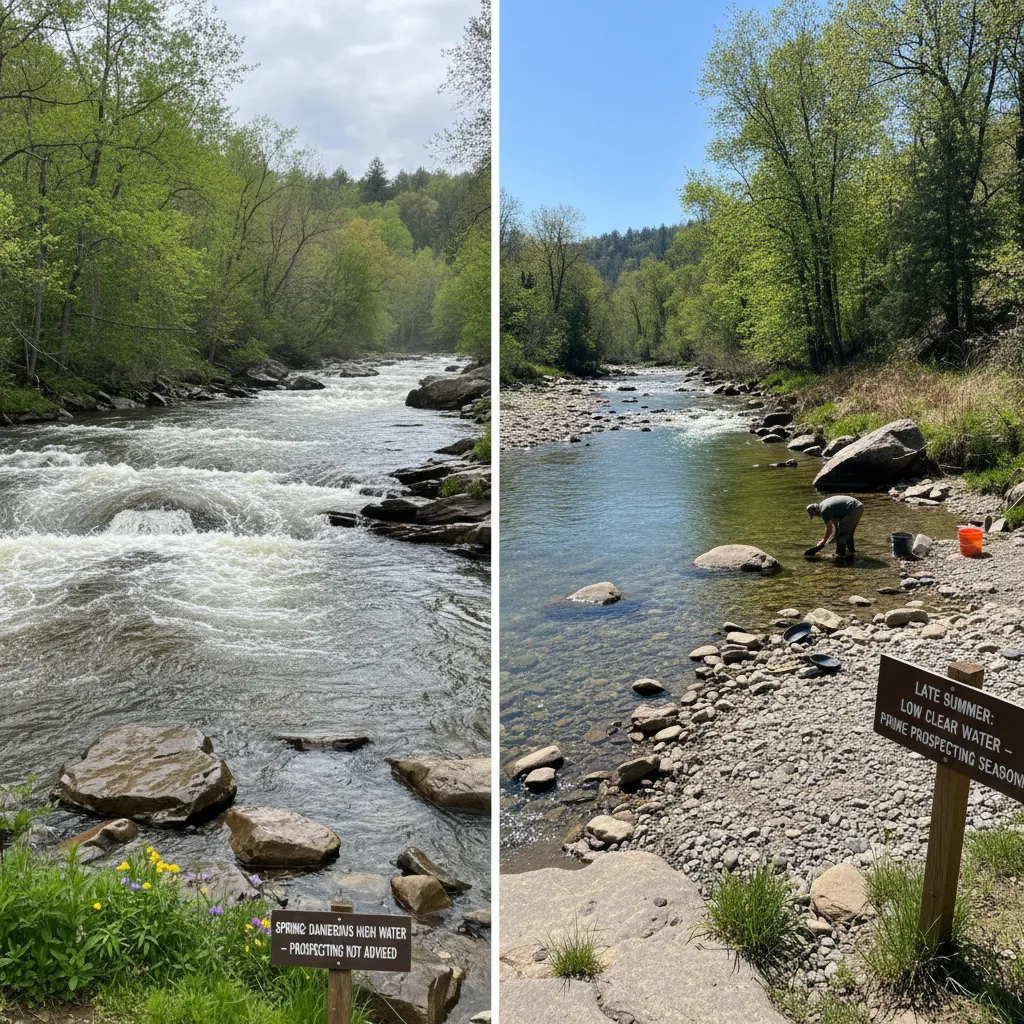
Late summer and early fall. That’s the answer.
Spring runoff scours the creekbed and redistributes everything. The water is high, fast, cold, and dangerous. You can’t access bedrock. You can’t see the river features you need to read. I tried prospecting Clear Creek in May once and nearly lost a boot in knee-deep snowmelt. Never again.
By late July, water levels start dropping. By August and September, you can access gravel bars and bedrock that were under two feet of raging water in June. The gold that got redistributed during spring floods has had all summer to settle into its new positions. Crevices that were underwater are now exposed. Inside bends that were submerged are now walkable.
September is my favorite month for prospecting in Colorado. The tourists have thinned out, the water is low and clear, the aspen are turning, and the gold is sitting right where physics says it should be. I can usually get three or four Saturdays in before the weather turns.
Winter prospecting is possible in areas that don’t freeze, but short days and cold water make it miserable. I’ve done it. I don’t recommend it. My hands stopped working after about forty minutes and I dropped my snuffer bottle in the creek. Watched it float away. Fourteen-dollar lesson in seasonal timing.
How to Sample Efficiently
The biggest time-waster in river prospecting is committing to a spot too early. I used to find one flake and then spend four hours working the same gravel bar, convinced I was about to hit the motherload. I never did. That one flake was often just a stray.
Now I sample first. Here’s my method:
- Walk the stretch first. Spend fifteen minutes just looking. Identify inside bends, boulders, exposed bedrock, velocity transitions, and any other features where gold should settle.
- Take quick test pans. One pan per feature. Don’t do a perfect, careful pan — just a quick wash to see if there’s anything there. Thirty seconds each.
- Rate each spot. No gold, trace gold, or visible gold. Mark the visible-gold spots mentally (or drop a rock as a marker if you’re forgetful like me).
- Commit to the best spot. Go back to wherever you got the best test result and work it properly. Dig deeper. Pan carefully. Work the area systematically.
- Sample crosswise. Once you’re working a productive spot, pan across the width of the deposit — perpendicular to the current. You’re trying to find the edges of the pay streak so you’re always digging the richest material.
This approach usually takes about thirty minutes before I settle in somewhere. It feels slow compared to just diving in, but it saves hours of working dead ground. The best prospecting locations in the country are only productive if you’re digging in the right micro-location within them.
Equipment for River Prospecting
You don’t need much. Here’s what I actually bring, not what gear companies want me to buy:
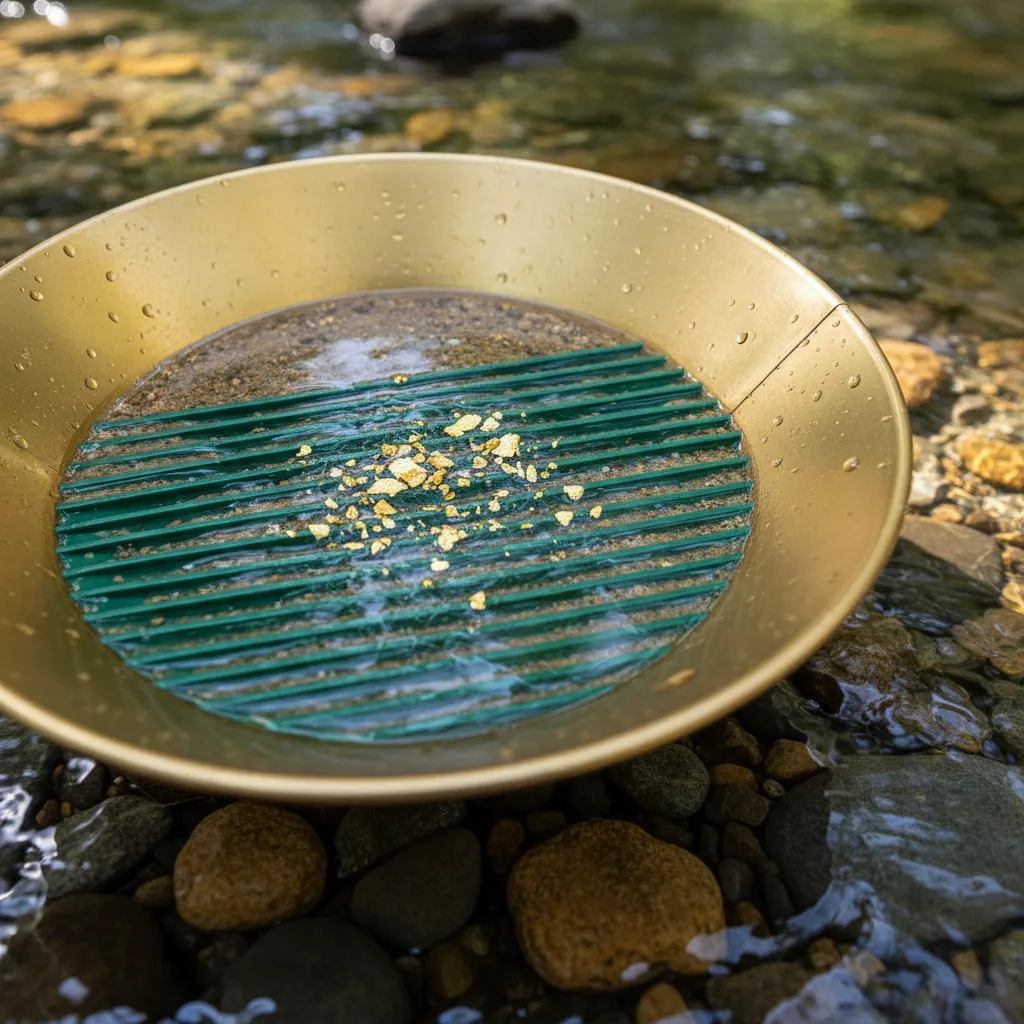
- 14-inch classifier screen (1/2 inch mesh) — screens out rocks so you’re only panning fine material. Makes everything faster.
- Gold pan — I use a Garrett 14” green. Twelve bucks. I wrote a whole beginner’s guide to panning if you need the rundown.
- Snuffer bottle — Pro-Line brand, wider tip. For picking up flakes too small for fingers.
- Crevicing tools — flat-head screwdriver, dental picks, a small spoon. For cleaning bedrock cracks.
- Glass vial — screw-top, not cork. Cork falls out. Ask me how I know.
- 5-gallon bucket — for hauling material from the dig spot to your panning spot. Worth it every time.
- Knee pads — optional but your future self will thank you. I resisted these for a full year out of stubbornness and my knees have opinions about that decision.
That’s it. Everything else is optional. A sluice box is nice if you want to process more material, but for learning to read the river, a pan is all you need. I put together a full gold panning equipment guide with specific product recommendations if you want the deep dive on gear.
Know the Rules Before You Dig
Before you hit the river, check the regulations for where you’re prospecting. Rules vary dramatically by state — some allow recreational panning on public land with no permit, others require written permission or restrict you to specific stretches of water. A few states have seasonal closures to protect spawning fish.
I’ve put together a guide to gold panning laws by state that covers the basics, but always verify with your local BLM office or state lands department before you dig. Getting hassled by a ranger ruins a prospecting trip faster than a rainstorm.
The short version: stick to public land, don’t use motorized equipment without permits, don’t dig in designated wilderness areas, and respect active mining claims. Most abandoned mine sites on public land are fair game for recreational panning, but always double-check.
Is It Actually Gold? How to Tell in the Field
You’re going to find things in your pan that look like gold but aren’t. It happens to everyone, every single trip. The two main culprits are pyrite (fool’s gold) and mica.
Here’s the quick field test: real gold stays at the bottom of your pan and doesn’t break apart. Mica floats away when you swirl water over it. Pyrite shatters if you press it with a knife or fingernail. Gold is soft — it deforms, it doesn’t break.
The color is different too. Gold has a warm, buttery yellow that doesn’t change in shade or sunlight. Pyrite looks brassy and glints with a harder, more metallic shine. I have a whole guide to identifying gold vs. pyrite with side-by-side comparisons if you want the detailed breakdown.
The other thing beginners mistake for gold is “flow sand” — fine, glittery material that sits on the surface of gravel bars. Flow sand contains no gold. It’s lightweight material deposited by the last high water. You want the hard-packed, heavy mineralized gravel underneath. If the material you’re digging scoops up easily and feels light, you’re in flow sand. Dig deeper.
The Mistake That Costs Beginners the Most Gold
Panning random gravel.
I cannot stress this enough. The difference between finding gold and finding nothing is almost never about technique or equipment. It’s about location. Not which river you’re on — which exact spot within that river you’re digging.
Two people can stand thirty feet apart on the same creek, using the same pan, with the same skill level, and one finds gold while the other finds nothing. The difference is that one of them read the water and chose a spot where gold should be. The other just picked somewhere convenient.
Learn to read the river. Watch the current. Look for inside bends, velocity transitions, obstructions, exposed bedrock. Sample multiple spots before committing. Let the water tell you where the gold is.
It’s been telling you the whole time. You just have to listen.