Published
- 23 min read
How to Pan for Gold: A Beginner's Complete Guide (2026)

I’m going to be honest: my first few gold panning attempts were disasters.
I stood in Clear Creek near Idaho Springs, Colorado for three hours on a Saturday in August, swirling a pan like I was making soup, and went home with nothing. Not a single flake. My girlfriend at the time was reading in the car and asked “did you find anything?” and I changed the subject. The drive home was quiet.
It wasn’t the creek’s fault. I was just terrible at panning.
It took me weeks of trial and error, a few YouTube rabbit holes (shoutout to Ask Jeff Williams — his channel actually explains the physics of why gold moves the way it does in a pan, which nobody else bothers to do), and one humbling afternoon watching a retired prospector named Gene work the exact same gravel I’d given up on. Gene pulled three flakes in fifteen minutes using a beat-up steel pan that looked older than me. I asked what I was doing wrong. He said “everything.” He wasn’t smiling when he said it.
Gene spent the next twenty minutes basically giving me a lesson I didn’t ask for but desperately needed. He showed me the shaking motion, explained why I was tilting too steep, and told me I was digging in the wrong spot. He also told me my snuffer bottle was garbage, which it was. That afternoon I found my first flake. One. But it was gold, and Gene nodded like I’d done something acceptable, which from Gene was basically a standing ovation.
This is the guide I wish someone had given me before my first trip.
What Is Gold Panning and How Does It Work?
Gold panning is a simple gravity separation method that uses water and a shallow pan to separate gold from sand, gravel, and other sediment. It works because gold is 19.3 times denser than water — roughly 6 to 7 times heavier than the sand and rock in your pan. When you agitate material in water, gold sinks to the bottom while lighter material rises and washes away. The technique is essentially unchanged since the 1848 California Gold Rush, and it remains the cheapest, most accessible way to find gold. All you need is a $10-15 pan, a creek with gold-bearing gravel, and about 20 minutes of practice.
A gold pan is basically a miniature version of the wash plants and sluice boxes used in commercial mining — just powered by your hands instead of a motor. The riffles molded into modern plastic pans act as tiny traps that catch gold particles as water flows over them, the same principle that drives every piece of gold mining equipment from pans to industrial dredges.
Essential Gold Panning Equipment for Beginners
Your Gold Pan
Get a 14-inch plastic pan in green or blue. Not black, not steel, not the novelty wooden ones at tourist shops.
Plastic is better than steel for beginners because steel pans need to be seasoned and they rust. Plastic pans have built-in riffles — ridged grooves along the inside edge that trap gold while you wash material out. Green or blue background makes gold pop. Gold is yellow. Against dark green or blue, even flour-fine specks are visible. Against black or gray you’ll miss half of what’s in your pan.
I use a Garrett 14-inch green pan. It costs about $12 and I’ve used the same one for three years. There is no reason to spend more than this on a pan.
Pan size matters. A 14-inch pan is the standard for creek work — big enough to process material efficiently, small enough to control when it’s full of wet gravel. If you want a second pan (and eventually you will), grab a 10-inch pan for final cleanup work at home. Some prospectors use an 8-inch pan for ultra-fine concentrates, but that’s overkill when you’re starting out. I tried a 16-inch pan once at a group dig near Dahlonega, Georgia and my arms were burning after four pans. Bigger is not better when you’re holding it in a creek for two hours.
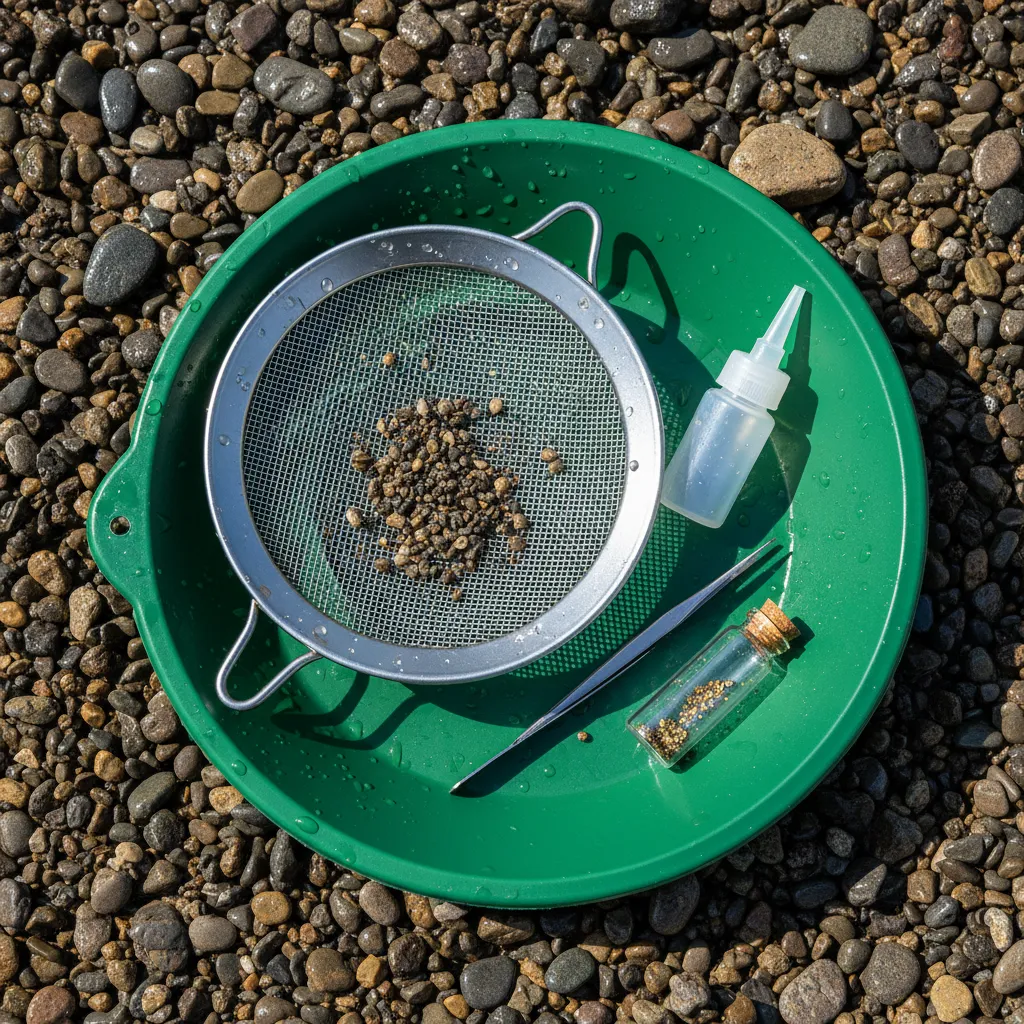
Everything Else You Need
A classifier screen (1/2 inch mesh) that sits on top of your pan and screens out rocks. Panning goes twice as fast when you’re not fishing out pebbles by hand. A snuffer bottle for sucking up tiny flakes. I use a Pro-Line — the wider tip works better than the cheap ones with narrow openings. I went through two bad snuffer bottles from Amazon before I figured this out. A small glass vial with a screw-top lid for storing what you find. Cork-top vials look cool but you will lose that cork, I guarantee it. Tweezers for the rare piece big enough to grab. A 5-gallon bucket for carrying material to your panning spot.
One thing nobody mentions: bring a drop of dish soap or Jet Dry. Gold is hydrophobic — fine particles can literally float on water’s surface tension instead of sinking. One tiny drop of surfactant in your pan water breaks that tension and keeps flour gold from escaping. Don’t overdo it — you want to break surface tension, not make a bubble bath.
What you don’t need yet: a sluice box, a blue bowl, a dredge, special prospecting boots, or any “gold finding kit” that costs more than $40. I bought a $60 “prospecting starter kit” online that came with a pan I never use, a snuffer bottle that didn’t work, and a booklet about the Gold Rush that told me nothing useful. Start with a pan and a snuffer bottle. Total cost: about $25-30. I wrote a full breakdown of gold panning equipment from beginner to advanced if you want to see exactly what’s worth buying and what’s a waste of money.
Where to Find Gold: Reading Rivers and Geological Signs
Here’s the thing that took me the longest to learn: technique matters, but location matters more. You can have flawless form and still find nothing if you’re panning material from the wrong spot. I know this because I spent an entire Saturday in the Bradshaw Mountains south of Prescott working a stretch that had zero gold. Zero. Six hours. The next week I moved fifty feet upstream to an inside bend with exposed bedrock and got color on my first pan. Fifty feet.
Gold is 19 times denser than water, which means it behaves differently than everything else in a stream. While sand and gravel get pushed along by current, gold sinks and gets trapped in predictable places. I cover this in much more detail in my guide on how to find gold in rivers and streams, but here’s the short version for panning.
Where Gold Settles in a Creek
I wrote a whole article on what placer gold is and how it forms, but for practical panning purposes, dig from these spots:
- Inside bends — water slows on the inside of curves and gold drops out of the current
- Behind large boulders — dead zones where gold settles (I found my best flakes behind an ugly brown boulder I’d been sitting on eating my sandwich)
- Bedrock crevices — gold works down through gravel until it hits rock and gets stuck. The bedrock contact — where gravel meets solid rock — is where gold concentrates most heavily
- Where the creek widens — current slows, check the gravel bars
- Downstream of confluences — where two streams meet, gold drops out in the turbulence
Don’t waste time on the middle of fast water, surface gravel on high banks, or sandy areas with no rocks.
Water Depth and Digging Tips
You want to dig where water is ankle to knee deep. Deep enough that there’s active flow moving material, shallow enough that you can reach the bottom comfortably. I’ve panned in water up to my thighs and it’s miserable — you can’t control the pan, your footing is bad, and you’re fighting the current the whole time.
Dig down as far as you can. Surface gravel is almost always barren. The good material is 6 to 12 inches down, ideally right at the bedrock contact. If you can see bedrock, scrape the crevices with a flathead screwdriver or a garden trowel — gold packs into cracks and stays there for decades. Some of my best finds came from jamming a screwdriver into a bedrock crack I almost walked past.
And always sample five or six spots with quick pans before committing to one location. Ten minutes of sampling saves you three hours in a dead spot.
How to Use Geological Data to Find the Best Panning Spots
This is where most gold panning guides stop — they teach you the technique and say “go find a creek.” But which creek? In which state? Near which town? If that’s the question you’re stuck on, I wrote a whole walkthrough on finding gold panning spots near you — the section below is the condensed version.
I’ve spent a lot of time digging into geological databases, and it’s changed how I prospect. Before I ever set foot in a creek, I know whether it has documented gold.
USGS Mine Location Data
The U.S. Geological Survey maintains the Mineral Resources Data System (MRDS), a database of over 300,000 mine and mineral occurrence records across the country. I used this data to plot over 75,000 historic mine locations on the GoldFever.app map. Zoom into your area and look for clusters of gold mine markers near creeks on public land. If there were mines there, there’s gold in the water downstream.
The gold mines by state data page breaks down exactly how many documented gold occurrences exist in each state. Some states that people don’t think of as “gold states” have hundreds of recorded sites. I also put together a ranked list of the best gold prospecting locations in the U.S. if you want specific regions to target.
BLM Mining Claims
The Bureau of Land Management tracks active and closed mining claims. If an area has active claims, that means someone is investing time and money to work that ground — a strong signal that there’s gold present. It also means you need to stay off their claim. Check the BLM LR2000 system before you go. Unclaimed areas adjacent to active claims can be productive panning spots.
How I Research a New Location
My process before a trip:
- Check the GoldFever.app map for documented mines near where I’m headed
- Verify public land status — National Forest and BLM land are your targets
- Look at the geology — gold-bearing formations show up on state geological survey maps. Greenstone belts, quartz veins, and serpentinite formations are good signs
- Check for active claims on BLM LR2000
- Study the creek on satellite imagery — look for inside bends, bedrock exposure, and access points
This five-minute research process has saved me from dozens of wasted trips. Technology doesn’t replace boots in the creek, but it tells you which creek to put your boots in.
How to Pan for Gold: Step-by-Step Technique
This is the part you came for. I’m going to break this down the way Gene explained it to me, not the way YouTube tutorials show it with dramatic swirling and camera angles designed for views.
Step 1: Fill and Classify Your Material
Scoop material from the spots I described above. Use your classifier to screen it into the pan — this removes anything larger than 1/2 inch so you’re working with uniform material. Fill two-thirds to three-quarters full. My early mistake was filling to the brim. Material spills out before you start, you can’t control an overloaded pan, and you feel stupid. Less is more.
Step 2: Submerge and Agitate
Get in the water and submerge the pan completely. Use your fingers to break up clay clumps, dirt balls, compressed material. Pull out roots and leaves. This matters because clay traps gold — if you leave clumps intact, the gold inside them washes out later when the clay dissolves. Spend 30 seconds on this. Really mash everything apart.
Step 3: Shake to Stratify (The Most Important Step)
This is the step that changed everything for me, and it’s the one Gene spent the most time on.
Hold the pan level, just under the water’s surface, and shake it side to side vigorously for 15-20 seconds. Not swirling. Shaking. Flat, back-and-forth movements. Like you’re leveling off a pan of rice.
This stratifies the material. Heavy stuff — gold, black sand, lead — sinks to the bottom. Light stuff rises to the top. You want the gold locked down at the bottom before you start washing the top layer off. I was shaking maybe three or four times before washing and it wasn’t enough. Gene made me shake for a full twenty seconds and I could feel the difference — the material compacted and settled in a way that three halfhearted shakes doesn’t achieve.
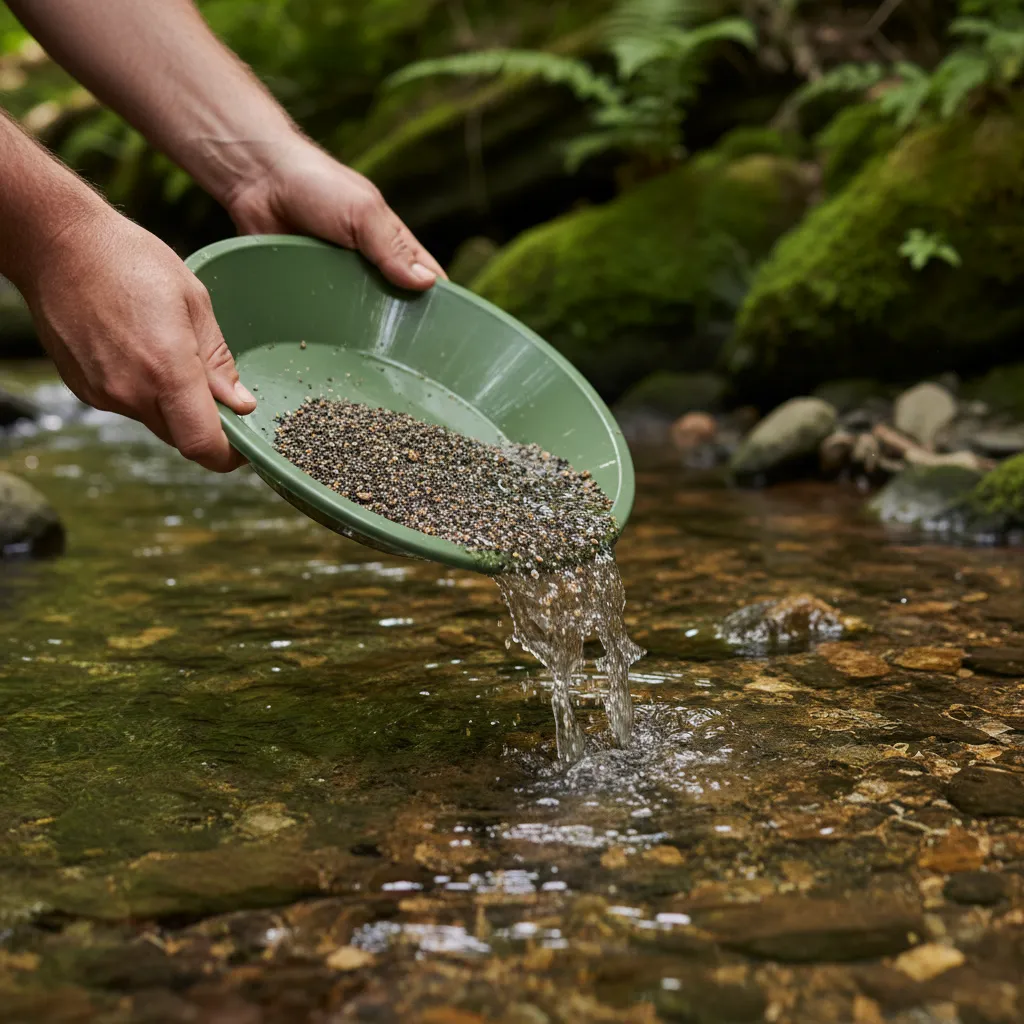
Step 4: Wash Away Light Material
Tilt the pan slightly forward — maybe 20 degrees, not the 45 that some guides recommend. Forty-five degrees is too aggressive for beginners and you’ll lose gold before you know it’s there. Let water flow into the pan from the back, carrying lighter material over the front edge. Gentle forward push-pull motion. Let the water do the work — you’re guiding, not dumping.
After every few washes, bring the pan back level and do another round of side-to-side shaking. The rhythm is: shake, wash, shake, wash. Not just wash. I lost gold for weeks because I was tilting and washing without re-shaking between rounds. The gold creeps up through the material and slides right out with the sand. Shaking between washes keeps it pinned to the bottom. This single fix doubled what I was finding.
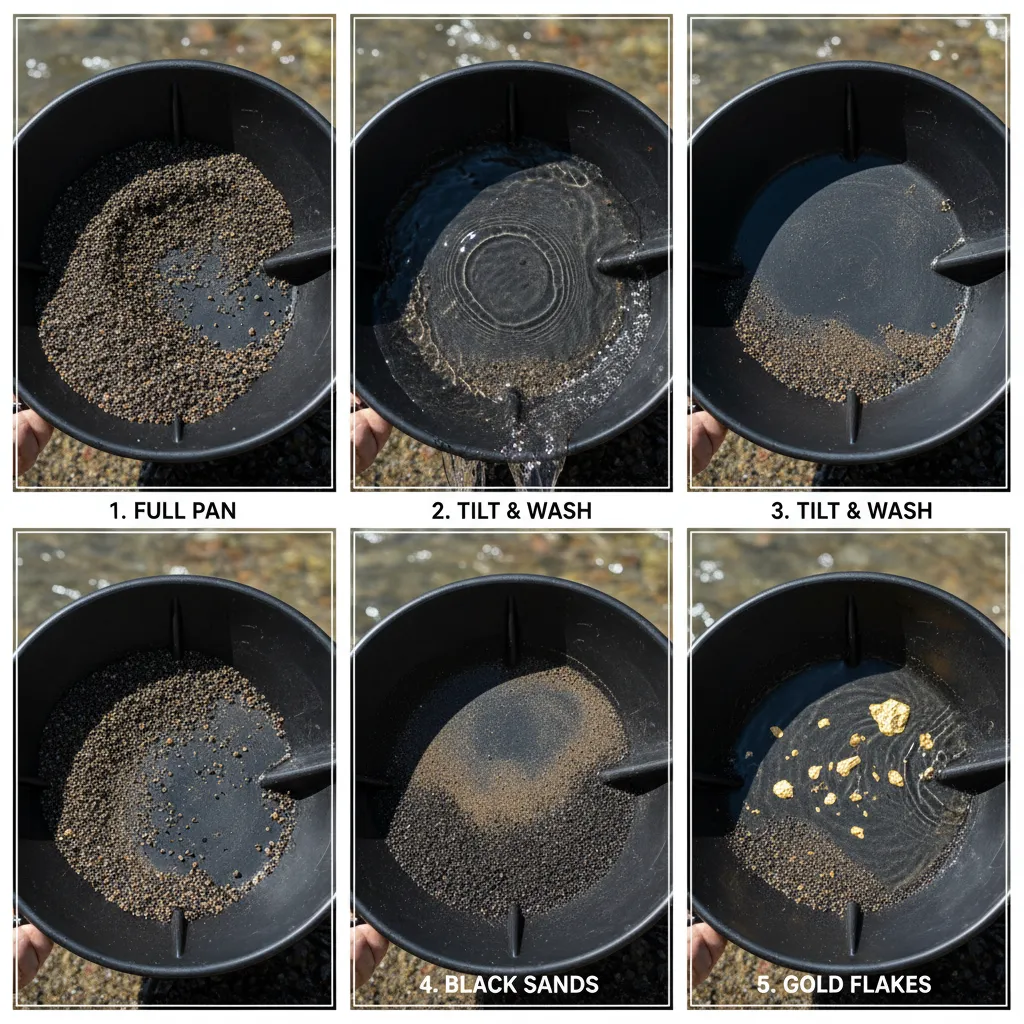
Step 5: Separate Gold from Black Sand
Keep repeating the shake-wash cycle. The pan gets lighter. The material gets darker — you’ll see black sand, which is magnetite, a good sign because it’s heavy like gold and collects in the same places.
When you’re down to maybe a quarter cup of black sand, slow way down. Switch from washing to gentle swirling. Add a thin layer of water and swirl it in a slow circle. The black sand spreads out and you start to see tiny yellow flakes against the green background.
The first time I saw gold in my pan, I said “no way” out loud. Nobody was around to hear me, which was probably for the best. It’s unmistakable once you know what to look for — a bright, warm yellow that doesn’t glitter or flash like mica. It just sits there, heavy and solid and completely unimpressed by the fact that you found it.
Step 6: Recover and Store Your Gold
Snuffer bottle. Squeeze, touch the tip to the flake, release. The flake gets pulled in. Deposit into your vial with a little water. For bigger pieces, tweezers. But most of what you’ll find as a beginner is fine gold — specks and small flakes.
When you think you’ve got all the gold out, add a tiny bit of water and do one more slow swirl. Gene told me this and he was right — there’s almost always one more flake hiding in the black sand.
Pro tip: Save your black sand concentrates. Take them home and dry them out, then run a magnet through to pull out the magnetite. Whatever’s left that isn’t magnetic could contain fine gold you missed in the field. I’ve recovered gold at home from concentrates I thought were clean.
Wet Panning vs. Dry Panning
Everything above is wet panning — the standard method that works anywhere you have water. But there’s also dry panning, which uses air instead of water to separate gold from lighter material.
Dry panning is mainly used in desert environments where there’s no creek — parts of Arizona, Nevada, and the Mojave. You gently toss classified material into the air and let the wind blow away the lighter particles while gold falls straight back down. It works, but it’s significantly harder than wet panning. You lose more fine gold, you need consistent wind, and the learning curve is steeper.
My advice: start with wet panning. It’s more forgiving, more efficient, and more fun. If you end up prospecting in the desert later, you’ll have the fundamentals down and can adapt.
Types of Gold You’ll Find
Not all gold looks the same, and knowing what to expect keeps you from either missing it or getting excited about the wrong thing.
Flour gold — the most common find for beginners. Tiny flat specks, smaller than a grain of rice, sometimes barely visible. This is what I found for my first three months. Don’t be discouraged by it — flour gold adds up.
Flake gold — flat pieces roughly the size of a pinhead to a small pea. Once you’re consistently finding flakes, you’re panning the right spots with decent technique.
Picker gold — large enough to pick up with tweezers. Finding pickers means you’re on good ground.
Nuggets — the dream. Rare in a pan. Most nuggets are found with metal detectors or by working bedrock crevices. In three years of regular panning, I’ve found exactly two pieces I’d call nuggets, and neither was bigger than a BB.
I wrote a detailed guide on what placer gold looks like and how it forms if you want to understand why gold shows up in the sizes and shapes it does. The short version: gold that’s traveled far from its source gets beaten flat and small. Gold close to the source tends to be chunkier and more angular.
Gold vs. Fool’s Gold: How to Identify Real Gold
This trips up every beginner. You’ll find something yellow and shiny and your heart rate jumps. Here’s how to tell if it’s real:
| Test | Real Gold | Fool’s Gold (Pyrite) |
|---|---|---|
| Shape | Flat flakes, rounded edges | Cubic crystals, angular |
| Color | Rich buttery yellow | Brassy, pale yellow |
| Shine | Dull metallic luster | Glitters and flashes in light |
| Hardness | Soft — dents with a pin | Hard — scratches glass |
| Behavior in pan | Stays at the very bottom | Washes out with lighter material |
| Streak test | Yellow streak on ceramic | Greenish-black streak |
The easiest field test: gold doesn’t glitter. If it catches the light and sparkles, it’s mica or pyrite. Gold has a steady, warm glow that doesn’t flash when you move the pan. Also, real gold stays in the bottom of the pan through all that shaking and washing. Pyrite is only about 5 times heavier than water (compared to gold’s 19x), so it washes out with the mid-weight material.
I’ve got a complete guide to telling gold from pyrite, mica, and other lookalikes with close-up comparison photos.
Common Mistakes Beginners Make (and How to Avoid Them)
Not shaking enough between washes. Already covered this. Single biggest fix I made.
Tilting too steep. Steep angle means fast washout means lost gold. Start shallow — you can always tilt more, you can’t un-lose gold.
Panning in the wrong spot. Already covered this too. Sample first, commit second.
Expecting nuggets. Most gold you’ll find panning is flour gold — specks smaller than a grain of rice. I almost quit after my second trip because I thought the tiny flakes didn’t count. They count. That’s what most placer gold looks like. If you add up your flour gold over a season, the vial starts to look real.
Throwing out the black sand too aggressively. Black sand concentrates where gold concentrates. When I first started I’d wash out the black sand and lose fine gold with it. Now I save my concentrates and process them at home with a magnet to separate the magnetite from any remaining gold.
Skipping the surfactant. Fine gold floats. It’s counterintuitive because gold is so heavy, but surface tension is real. One drop of soap solves this.
Not classifying material. Dumping unclassified gravel with 2-inch rocks into your pan makes everything harder. Those rocks take up space, interfere with stratification, and slow you down. Thirty seconds with a classifier saves ten minutes of frustration per pan.
Best Times of Year to Pan for Gold
Gold panning has a season, and it varies by region.
Spring (March–May): Hit or miss. Snowmelt can make creeks dangerously high and fast. In the western states — Colorado, California — April and May often have flows too strong for safe wading. But spring flooding also moves gold and redeposits it in new locations. If you can find an accessible spot during moderate runoff, freshly deposited gravel bars can be productive.
Summer (June–August): Peak season. Lower water levels expose gravel bars and bedrock that’s submerged the rest of the year. Water temperature is tolerable. This is when I do 80% of my panning. Late July through August is usually ideal in mountain creeks — low enough to reach good material, warm enough that your hands don’t go numb.
Fall (September–October): My favorite time. Fewer people, comfortable temperatures, and water levels are still low. Fall in North Carolina and Georgia is especially nice — the gold belt runs through beautiful hardwood forest and the weather is perfect.
Winter (November–February): Possible in southern states but cold and miserable in the mountains. I’ve panned in December exactly once. My hands stopped working after twenty minutes. Neoprene gloves help but reduce your feel for the material. Most prospectors use winter for researching new spots and planning spring trips.
The best single tip: go panning after the first big storm that follows a dry spell. Storms flush new material into creeks and redistribute gold. The gravel bar that was empty in July might have fresh deposits in September after a big rain.
How Much Gold Can You Realistically Find?
Let me set expectations honestly, because nobody else does.
A typical beginner outing — say four hours on a decent creek — yields somewhere between nothing and a few small flakes. On a good day at a productive location, I might find 0.1 to 0.3 grams after a full day of focused panning. At current gold prices (around $3,000 per troy ounce in early 2026), that’s roughly $10-30 worth of gold for a full day’s work.
You will not get rich panning for gold. A retired prospector once told me “don’t invest more in gold mining than a $10 gold pan, because you’ll probably go broke.” He was being funny but he wasn’t wrong.
So is gold panning worth it? Absolutely — just not for the money. It gets you outside, teaches you to read landscapes, gives you an excuse to explore public lands you’d never visit otherwise, and produces a tangible result you can hold in your hand. The feeling of finding gold never gets old. My vial has maybe $200 worth of gold in it after three years. I’ve spent more than that on gas getting to creeks. I don’t care. It’s gold, and I found it.
That said, some recreational panners in gold-rich areas do accumulate meaningful amounts over years. There are guys working the American River drainage in California who pull respectable amounts, and the amount of documented gold across U.S. states is staggering. The gold is there — commercial-scale recovery just isn’t practical with a hand pan.
Gold Panning Laws: Where It’s Legal by State
Where can I pan for gold for free? National Forest and BLM land are generally open for recreational panning with hand tools — no permit needed in most states. This covers millions of acres across the western U.S. and significant public land in eastern gold states too.
The rules vary significantly by state, though. Some states require a free permit. A few restrict you to specific waterways. Active mining claims are off limits without the claim holder’s permission — claims aren’t always marked on the ground, so check the BLM LR2000 database before you go. State parks and private land: assume no unless you’ve specifically confirmed otherwise.
I put together a comprehensive breakdown of gold panning laws by state covering permit requirements, restricted areas, and specific regulations for each state. Check it before you go. Getting caught panning on an active claim or in a restricted area isn’t worth the trouble.
The universal rules: pan only with hand tools, fill your holes, don’t disturb stream banks, and pack out what you brought in. The old mine sites and tailings piles near historic mining areas are often on public land and can be productive panning spots — just make sure the area isn’t claimed.
From Panning to Prospecting: Next Steps
Once you’ve got the panning basics down and you’re consistently finding color, there’s a whole world of gold mining techniques from hand panning to mechanized recovery beyond the pan. Panning is the foundation — every other method is just processing more material faster using the same gravity separation principle.
Sluice box — the natural next step. Sets up in a creek and processes 10x the material a pan can. Still hand-powered, still legal on most public land with hand tools. A basic sluice runs about $50-80 and uses the same riffle principle as your pan — water carries light material over raised bars while gold drops behind them. When you’re ready to make the jump, my gold sluice box guide covers choosing, setting, and running one properly.
Metal detecting — a completely different approach that finds gold pans miss. Detectors find nuggets and larger pieces buried in ground you’d never think to dig. I wrote a beginner’s guide to metal detecting for gold if you want to explore that direction. Some people find metal detecting around old mine sites to be even more productive than creek panning.
Crevicing — using hand tools to work bedrock cracks and crevices. Tedious but incredibly productive if you find the right bedrock. Some of the biggest gold I’ve found came from a crack I spent thirty minutes cleaning out with a screwdriver and a spoon.
Highbanking and dredging — motorized equipment that moves serious volume. Requires permits in most states and is outright banned in some. Not beginner territory, but good to know it exists.
Go
Bring your $12 pan, a snuffer bottle, a bucket, and zero expectations. Pick a creek with documented gold — check the GoldFever.app map, browse the best prospecting locations in the U.S., or use my guide to gold panning near me and the gold occurrences by state data to find a spot close to home. Find a spot with exposed gravel near bedrock on an inside bend. Take your time with the shake-wash-shake rhythm.
I still remember my first real find. One flake, maybe the size of a pinhead, sitting in a smear of black sand. I stared at it for a solid minute before I trusted myself to use the snuffer bottle. It’s in a vial on my desk right now, next to a jar of pyrite I excitedly collected from the Yuba River before I knew the difference. The pyrite jar is bigger. The gold vial is worth more. Both remind me that I had no idea what I was doing and I went anyway.
You don’t need expensive equipment. You don’t need to be in California. You just need running water, the right technique, and a willingness to feel stupid for a while. I caught my classifier blowing away in the wind last month because I set it down on a rock like a genius. This hobby keeps you humble.